WooCommerce: How to Create A Private Store

WooCommerce powers over 26% of global eCommerce websites and is an excellent and convenient way to create your online shop without writing a single line of code.  

But besides its convenience – another factor that makes WooCommerce a popular choice is its flexibility. While the core WooCommerce installation helps you create a basic online store with ease – specific paid WooCommerce plugins make it easy to create a customized and ideal business model of your choice. 

For instance, several businesses prefer a private WooCommerce store model to grant access or sell products and services to specific customers and hide from the others. This is where a private store for WooCommerce plugins comes into the picture. 

A great example is Oriflame – a direct sales leading beauty company that sells products for everyone and reserves some for specific VIP members on their website. They offer benefits like exclusive discounts, access to a complete range of products, and fast delivery to these VIP members. 

There can be multiple other reasons behind creating a private WooCommerce store. In this article, we’ll briefly touch on those reasons and share some of the best WooCommerce private store plugins you can use for your WooCommerce store. Let’s go!

Continue reading WooCommerce: How to Create A Private Store

WooCommerce: How to Get Started with WooCommerce Blocks – PART 2

WooCommerce is one of the leading eCommerce platforms marking its territory in the eCommerce industry one website at a time – with over 5 million downloads. It offers a complete online store solution for small and medium-sized businesses and web professionals.       

And now, the development team is working at making WooCommerce fully compatible with Gutenberg. And the first phase is about building custom WooCommerce Blocks that can be used in the new WordPress editor.

These blocks come free of cost and let you customize and change the complete look and feel of your WooCommerce store – without typing a single line of code. With a simple drag and drop tool – you can place your store products wherever on the website in whichever desired format.

In part 1 of this article we saw ten WooCommerce blocks and their significance. In this article, we’ll talk about ten more blocks you can use for an interactive online store. But first, let’s learn about adding and editing these blocks on your store. 

Continue reading WooCommerce: How to Get Started with WooCommerce Blocks – PART 2

WooCommerce: How to Get Started with WooCommerce Blocks – PART 1

Since WordPress 5.0, the default page/post editor has been completely redeveloped. Surely, you’ve heard about Gutenberg.

Bad news is that WooCommerce joined the new editing experience much more slowly, and there are still major things to develop in order to make it Gutenberg-friendly.

The compatibility progress can be tracked via the WooCommerce Blocks official plugin, which states “You can use this plugin if you want access to all the available blocks for WooCommerce – including experimental ones. Our current “stable” blocks are bundled into WooCommerce, and can be added from the “WooCommerce” section in the block inserter“, because you can find their “beta” blocks in there, those they call “experimental” and that will be officially released into WooCommerce once they are approved.

In this article, we’ll specifically dive deep into WooCommerce Blocks – what they are, why they’re important, how many blocks are available, and how you can use them. 

Since this is a huge topic – we have twenty WooCommerce Blocks to cover – we’re dividing it into two parts. This article will evaluate the first ten Blocks you can use in your store. But first, let’s identify what WooCommerce blocks are and investigate why they are so important.

Continue reading WooCommerce: How to Get Started with WooCommerce Blocks – PART 1

WooCommerce Product Search Plugins to Enhance Customer Experience

Say you’re at a clothing store. You know exactly what you want to buy but have to go through the store’s entire catalog to find the product. Sounds like a pointless hassle, right?

Now imagine you had a salesperson to assist you. They’d ask you a few questions – What are you looking for? What’s your budget? What size and color do you want? – and voila, you’ll get just what you wanted. 

This is exactly what a product search feature on your store can do for your customers. 

Product search allows customers to find items they’re looking for faster, improving their experience at your store and increasing the chances of a sale. 

Now, if you have a small WooCommerce store with a handful of products, navigating your website and finding products will be fairly easy. 

But if you offer a wide variety of products spread across categories, product search becomes an essential feature. 

Given its importance, WooCommerce comes with a default search form, which is great for getting started with this feature on your store. However, this form offers only basic features, letting customers search for products mainly by their names. 

For more advanced features – like live search, autocorrection, and providing more relevant results – Woo Product Search plugins can prove to be helpful. 

We’ve done the legwork and compiled a list of some of the best WooCommerce Product Search plugins that can enhance your customers’ shopping experience. Let’s explore them!

Continue reading WooCommerce Product Search Plugins to Enhance Customer Experience

WooCommerce: Display Selected Variation Info (price, weight, etc.) @ Single Product Page

We already saw how to get the “Variation ID” from the single product page once product attributes dropdown are selected. In that tutorial, we ran a jQuery “change” event once “input.variation_id” got updated.

However, that only gives us access to the variation ID. What if I need to read the variation price, stock quantity, SKU, weight, and so on? Well, in such case, we need different code. Enjoy!

Continue reading WooCommerce: Display Selected Variation Info (price, weight, etc.) @ Single Product Page

WooCommerce: How to Build a One-Product Website

Crocs started by selling just foam clogs, and now they’re a billion-dollar company. Casper earned millions selling only mattresses, while Sara Blakely became one of the youngest self-made female billionaires with Spanx, which sold only underclothes initially. 

Can you guess what all these brands have in common? It’s that they started off by selling just one product, built their entire brand around it, and yet became successful. 

Today, most eCommerce businesses sell multiple products – because of the presumption that the more products you offer, the higher chances of converting visitors and making a sale. But from managing operations to inventory, a store with many products comes with its own problems.

On the other hand, selling just one product can streamline your store’s operations and make inventory management and handling orders easy. 

It allows you to focus all your energy and resources on creating, marketing and improving a single product. If done correctly, this can help you build a significant brand value – as people will start associating your store with your flagship product, making you an expert in your market and helping you stand out from your competitors. 

Given its benefits, creating a one-product store is an excellent idea – all you practically need is the right product for your customer’s needs and a solid, easy-to-navigate website. 

Lucky for you, this article will help you with the latter, taking you through all the steps of creating a fantastic WooCommerce website for your one-product store

Let’s begin!

Continue reading WooCommerce: How to Build a One-Product Website

WooCommerce: Top Quick View Plugins

Imagine if your customers didn’t have to visit a separate product page every time they wanted to check out a product. They could see product details right from the page they’re on and avoid going back and forth between the store and product pages

Sounds convenient, right?

This is exactly what a quick view feature on your WooCommerce store can do. 

It allows shoppers to view product images, features, and prices from the shop page through a popup window. This way, they can see if they like the product and add it to their cart or simply close the popup and continue browsing items. 

That’s not it. By making product surfing and shopping fast and hassle-free, the quick view feature can also help you improve customer experience and increase your store sales and revenue. 

Although a pretty useful feature, WooCommerce doesn’t have any default settings to enable a quick view button in your store. 

The good news is that there are some great quick view plugins you can use to add this functionality to your shop and optimize it for sales. 

We’ve done the legwork and compiled a list of seven of the best WooCommerce quick view plugins you can use for your online store. Let’s dive in!

Continue reading WooCommerce: Top Quick View Plugins

WooCommerce: Rename “Read more” To “Out of stock” @ Shop

There is an unfortunate (IMO) add to cart button naming on the WooCommerce shop page / category pages / product loops. When an item is out of stock, the “Add to cart” (or “Select options” for a variable product type) button label will turn into “Read more”.

To be honest, that doesn’t really say much to the end customer. It’s quite confusing and doesn’t make much sense.

Today, we’ll see how to change that “Read more” label into something more comprehensible: “Out of stock”. A super easy trick. Enjoy!

Continue reading WooCommerce: Rename “Read more” To “Out of stock” @ Shop

WooCommerce: Sell More With Upsell & Order Bump Plugins

You’ve certainly heard of upsells and order bumps before, but somehow everyone seems to have their own definitions for these terms, the product makers on this list being no exception. The WooCommerce plugin further confuses things by inexplicably categorizing recommendations made on the product page as upsells and recommendations made on the cart page as cross-sells. Therefore, we need to get our terminology straight. 

First of all, we’re talking about product recommendations here, but not the type that simply appears on product and cart pages regardless of whether the shopper has put anything into their cart (we have covered those already). That type of product recommendation plugin often goes by the name of “Related Products for WooCommerce.” It is a crude instrument that gets the job done but is not as finely attuned as the tools in this listicle. 

Keep that in mind: the product recommendations we are discussing here, whether they are upsells, cross-sells, or downsells, are happening during checkout (before you finish your order) or post-checkout (after you finish your order). Upsells are typically defined as attempts to sell a more expensive product than that which has been purchased or is in the cart. Downsells are defined as attempts to sell a less expensive product. Cross-sells are defined as attempts to sell an equal-priced product. 

Sometimes, people specify whether they are talking about recommendations during the checkout or post-checkout process by using the term “post-purchase upsell/downsell/cross-sell.”

Others, like Chris Lema — who has recently established himself as an authority in this domain — refer to order bumps as upsells/downsells/cross-sells that happen during the checkout process and upsells as any type of purchase (no matter the price) that happens during the post-checkout process. This is very common. People use the term upsell to refer to downsells and cross-sells all the time. Unless otherwise stated, we will operate with the definitions set forth in this paragraph. 

So, now that we’re clear on our terms, we can begin discussing the top upsell and order bump products available for WooCommerce. 

Continue reading WooCommerce: Sell More With Upsell & Order Bump Plugins

WooCommerce: How to Drive Sales With Opt-ins

One of the hardest aspects of running a WooCommerce store is lead generation. Whether you want to convert visitors into subscribers or encourage them to make purchases, you may be looking for effective ways to convince users to take desired actions. 

This is where opt-in campaigns come in handy. When executed correctly, opt-ins can encourage visitors to engage with your brand in a variety of ways. 

This strategy is typically used in email marketing. You can add a pop-up on your site that encourages users to sign up to your newsletter to receive offers and deals in their inboxes. 

However, you can also use these pop-ups to drive more sales. For example, users who make orders on your website may get messages that prompt them to purchase an additional item to qualify for a discount or free shipping. 

While this process may seem a little complicated, it’s actually quite simple. All you need to get started is a powerful plugin that will enable you to create high-converting, automated campaigns easily. 

In this article, we’ll take a closer look at opt-in campaigns and how they can help you boost your sales. We’ll then show you how to set up three effective campaigns for your WooCommerce store. Let’s get started!

Continue reading WooCommerce: How to Drive Sales With Opt-ins

WooCommerce Blocks: Hide Images Etc. From Product Grid Block

Business Bloomer enters the world of Gutenberg today, and we do it with a simple customization tutorial related to the “Product Grid” WooCommerce Gutenberg Blocks: currently these are “Best Selling Products“, “Newest Products“, “On Sale Products“, “Top Rated Products“, “Products by Category” and use the same base code…

However, all of them use custom code and not the default WooCommerce templates (and therefore we can’t take advantage of the WooCommerce hooks for the shop / product archive / product loop unfortunately), so we need to find a workaround if we wish to remove some of the default elements that come up with the product grid items: product permalink, product image, product title*, sale badge, product price*, rating*, add to cart button* in this exact order.

* As you can see from the screenshot below, actually, you can already remove the information with an asterisk from the Block settings. So, in this article, we will see how to remove the rest in case you don’t want it: permalink, image, sale badge. Enjoy!

Continue reading WooCommerce Blocks: Hide Images Etc. From Product Grid Block

WooCommerce: Rename “Select Options” Button @ Shop Page

The WooCommerce shop page displays variable products with a “Select Options” button by default. However, if you’re looking to change it to something else (such as “View Product“) then I’ve got a useful snippet you can put to use.

Of course you can change the text to anything you like, by simply replacing the relevant string inside the snippet below. Enjoy!

Continue reading WooCommerce: Rename “Select Options” Button @ Shop Page

WooCommerce: How to Increase Your Conversions With Pre-Sales Activities

Online shoppers are expected to find your store, browse through your products and complete the purchase on their own. Those who seek variety, convenience and flexibility while shopping online, don’t mind the lack of human touch.

However, getting users to actually land on your WooCommerce store, get interested in the products and initiate a purchase can require some pre-sales effort.

Pre-sales process is a combination of activities performed to acquire new customers. It starts early on when you profile the target customers for your WooCommerce store and design your offerings according to their needs. Once they arrive on your website, your intention should be to ensure that they don’t leave without buying or at least engaging with you.

Furthermore, you can prioritize leads, move them through the sales funnel at a faster rate, and improve conversions while creating a positive customer experience.

So, how should you be setting up a robust pre-sales process for your online business?

Well, here is a list of the top ways to implement pre-sales functionality on your WooCommerce store so that you can optimize your conversions.

Continue reading WooCommerce: How to Increase Your Conversions With Pre-Sales Activities

WooCommerce: Open External Product Link In New Tab

Today I start a personal WooCommerce customization marathon as I try to relaunch my personal project A Piece of Sicily (a Sicilian products marketplace, WPML friendly, with products uploaded by vendors and external (affiliate) products).

Each week I will share a snippet I’ve personally coded, so that you can follow me along the going-live path and actually see the results on the live site.

This time, we’ll talk about External Products, and specifically at how to Open the external add to cart URL in a new tab, so that users stay on your WooCommerce website even after visiting the affiliate link. Enjoy!

Continue reading WooCommerce: Open External Product Link In New Tab

WooCommerce: Checkout Test Automation 101

E2E Checkout Testing

Testing the WooCommerce checkout is extremely important for your ecommerce business.

Every time you install a new plugin or update WordPress you might run into issues: for example, the cart and payment pages could stop working until you fix the problem.

You don’t want to lose sales and undermine your website reputation, do you? So you must test all the WooCommerce processes on a regular basis, also called “end to end” (E2E) testing.

But how can you do that without wasting too time?

Spoiler alert: simply create an automated test, and let the robot test your WooCommerce website on a regular basis, so that you never have to worry about doing it manually.

Luckily for you, there are some great tools – such as the two you will soon read about – and WooCommerce professionals that can do it for you on a daily or whatever basis.

Here’s your quick introduction to setting up your checkout test automation.

Cheers to a checkout page that works 365 days a year.

Continue reading WooCommerce: Checkout Test Automation 101

WooCommerce: Products With Equal Height @ Shop Page

You know, that’s one of the biggest WooCommerce display issues.

Products may have images of different proportions, different title lengths, some have review stars and some don’t, making the “product grid” layout (product archive template) a big mess. You’d be very familiar with the below screenshot I guess.

So, here are a few options you have to make the display consistent. Enjoy!

Continue reading WooCommerce: Products With Equal Height @ Shop Page

WooCommerce: Edit Product Layout If Logged In

Logged in customers often require different UX, communication and website layout. You can hide add to cart buttons for logged out users, yes, but you can also completely remodel the single product page layout. For example, you can remove the featured image, the add to cart button (because maybe you only want them to purchase one product), the sale badge, the price, product tabs, and so on – while also adding logged-in only information such as custom buttons, banners and media.

In this tutorial we’ll see how to target logged in customers who purchased the current product, how to remove some default layout elements and how to add some custom HTML and CSS to the single product page. Enjoy!

Continue reading WooCommerce: Edit Product Layout If Logged In

WooCommerce: 5 Ways To Drive Sales In Your Store

The primary goal of your WooCommerce store is to sell, right?

You’ve probably got some snazzy marketing campaigns running, are working to sharpen your SEO tactics, and are using social media to bring more visitors to your store. But, while driving traffic to your site is important, there’s another key metric you need to keep in mind: your conversion rate. After all, what’s the point of bringing visitors to your store if they don’t end up buying anything?

It’s a no-brainer that more traffic is useless if it’s not bringing you more conversions. The key, then, is to focus on doing more with the shop visitors you already have

This is where website analytics (such as those collected and stored by Google Analytics and Metorik) can be a game changer. Read on for 5 CRO hacks for WooCommerce users.

Continue reading WooCommerce: 5 Ways To Drive Sales In Your Store

WooCommerce B2B: How to Set Up a Wholesale Store

The ecommerce sector is seeing incredible growth, year after year, with no foreseeable end in sight. The same is true for B2B ecommerce, yet there aren’t many good platform choices available for small-to-medium businesses that want to sell wholesale. There are several SaaS solutions on the market, but these are costly, closed-source, and mostly oriented towards larger businesses.

If you are a business owner or developer, WooCommerce is a solution that’s free, versatile and powerful. 

Continue reading WooCommerce B2B: How to Set Up a Wholesale Store

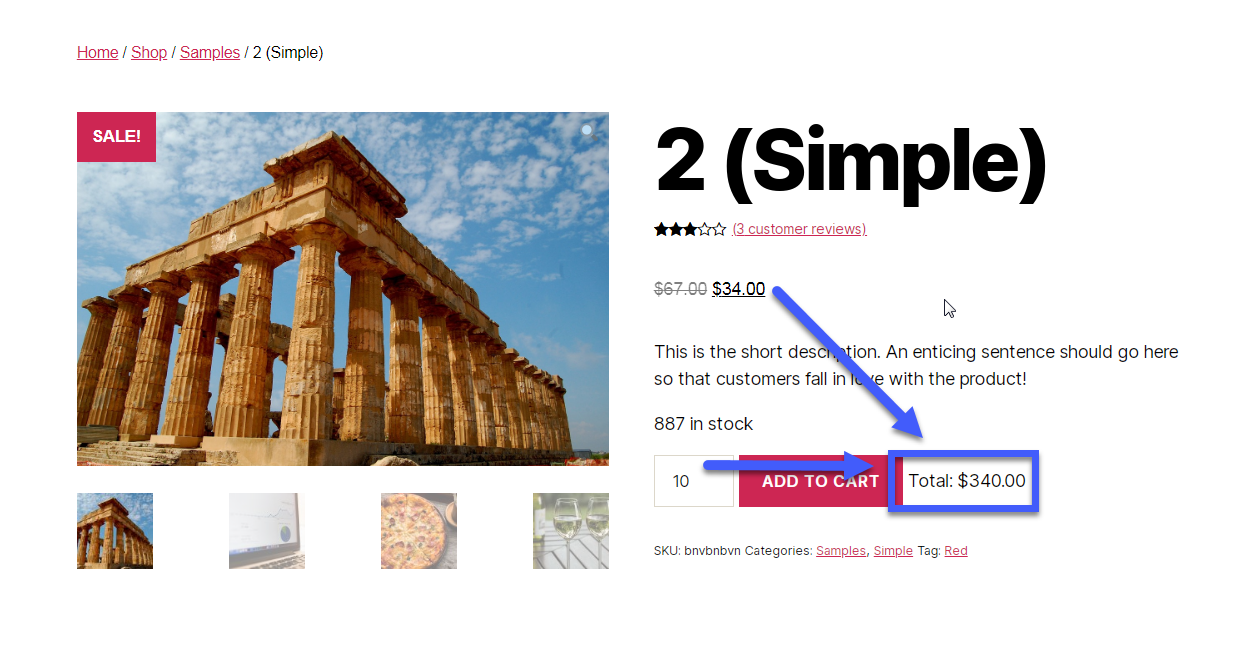
WooCommerce: Calculate Subtotal On Quantity Increment @ Single Product

From a UX point of view, ecommerce customers may enjoy a little improvement on the WooCommerce single product page. As soon as they increase the add to cart quantity, it’d be nice if product price could be recalculated or maybe if a “TOTAL” line could appear so that users always know how much they are about to add to cart.

Honestly, this is hard to explain it this way, so the best is if you look at the screenshot. Enjoy!

Continue reading WooCommerce: Calculate Subtotal On Quantity Increment @ Single Product