WooCommerce: Search By Custom Field (Frontend)

The default WooCommerce frontend product search returns results based on whether the search term is present in the product title, short and long description. Also, you can optionally search products by SKU.

But what if you also want to search for a custom field value e.g. you have a custom field called “_brand” and you want to get the products where “_brand” is equal to “apple“?

Now, I’m not sure I’ve explained this in plain English, so let’s take a look at a practical example. Enjoy!

Continue reading WooCommerce: Search By Custom Field (Frontend)

WooCommerce: Populate Checkout Fields From URL

On top of adding products to cart via URL and redirect to checkout, there is a way to also fill out the Checkout page input fields within the same link.

This could be super handy when you know the billing/shipping details of a registered or guest customer and want to speed up the order process.

It’s important to note that the URL will need to contain personal data e.g. email address, billing address, phone number, and so on; you need to make sure the URL is only shared with the specific customer (in an email, for example, as content is tailored to the subscriber; or only when the WooCommerce customer is logged in if you’re using the URL behind a website button).

Once that’s clear, let’s go ahead, and let’s see how my WooCommerce snippet works. Enjoy!

Continue reading WooCommerce: Populate Checkout Fields From URL

WooCommerce: Hide Weight & Dimensions From Additional Information Tab @ Single Product

If a WooCommerce product comes with weight and/or height / length / width values, these will be displayed by default in the Single Product page, under the “Additional Information” tab.

Should you need to hide them completely from the frontend while keeping the list of attributes below them, thankfully there’s a PHP one-liner you can use. Enjoy!

Continue reading WooCommerce: Hide Weight & Dimensions From Additional Information Tab @ Single Product

WooCommerce: Purchasing Power Parity (PPP) Discounts

Since… today, Business Bloomer online courses are affordable for everyone.

It’s unfortunate that digital products (such as our WooCommerce online courses) are priced in USD dollars but there is no adjustment for less privileged countries.

This is a pity because content should be accessible to ALL WooCommerce developers around the world, no matter their income level. I receive dozens of emails per month from amazing people who can’t really afford a USD 397 course because they make that amount of money in 4 months if they’re lucky.

So, let’s change this. Here comes Purchasing Power Parity (PPP) to the rescue.

PPP is a special metric that tells us the real “purchasing power” of a given country. Take a basket of identical goods, pay in your local currency in your own country; purchase the same items in USD in the United States. Compare that difference to the actual exchange rate. Now you really have an idea of how much a country can afford to pay for that basket of goods.

Let’s talk in plain English. Are you from India? You may get up to 75% off our online courses. Are you from South Africa? Maybe a 59% discount! Are you from Argentina? 61% off on average. Are you from Norway? No discount, sorry (it seems you do better than the US). And so on…

In this post, I’ll go through a quick PPP math example to give you some context, and then I’ll tell you how I implemented PPP discounts in this same WooCommerce website.

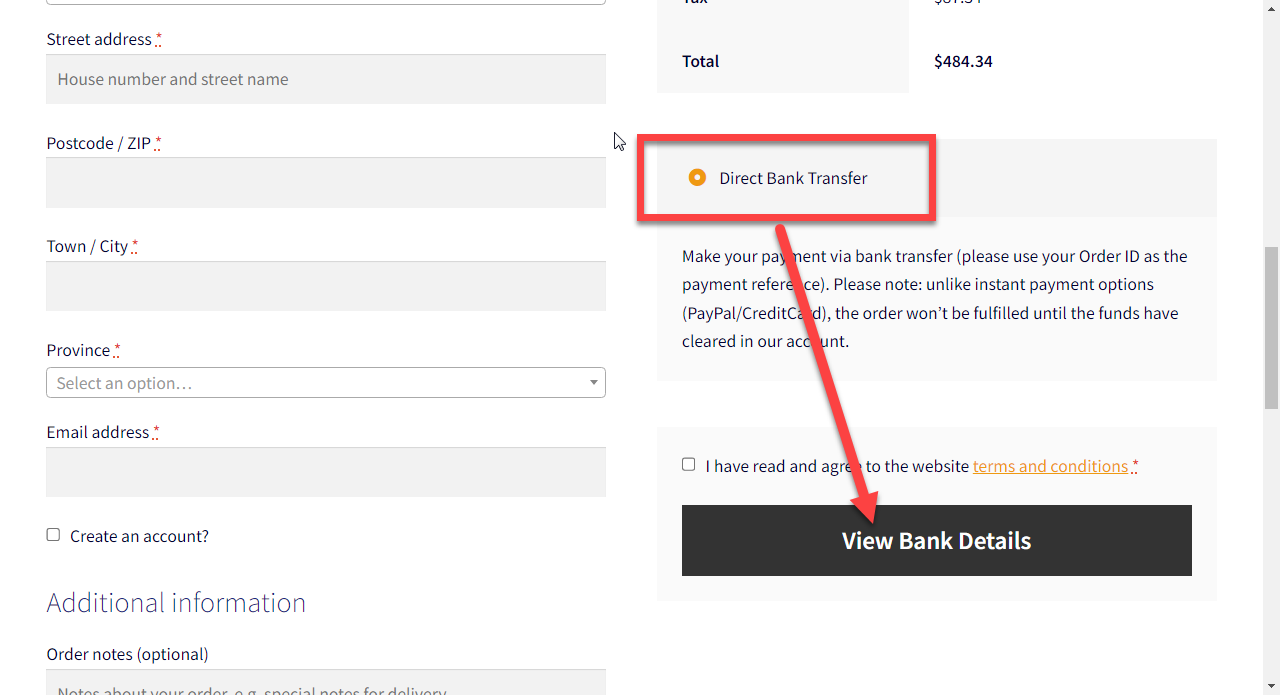
Want to help me test the PPP discount functionality which is currently in beta? Add a course to cart e.g. CustomizeWoo PRO, select your billing country at checkout, and leave a comment below with the discount you got, if any.

Enjoy!

Continue reading WooCommerce: Purchasing Power Parity (PPP) Discounts

WooCommerce: Change Product Quantity @ Checkout Page

We covered a lot of WooCommerce Checkout customization in the past – it’s evident that the Checkout is the most important page of any WooCommerce website!

Today we’ll code a nice UX add-on: how do we show product quantity inputs beside each product in the Checkout order table? This is great if people need to adjust their quantities on the checkout before completing their order; also, it’s helpful when you have no Cart page and want to send people straight to Checkout and skip yet another click.

In this post, we’ll see how to add a quantity input beside each product on the Checkout page, and then we’ll code a “listener” to make sure we actually refresh the Checkout and update totals after a quantity change. Enjoy!

Continue reading WooCommerce: Change Product Quantity @ Checkout Page

WooCommerce: Override Product Category Page Title

This is an interesting WooCommerce customization – as you know WordPress menus and widgets read whatever product category name and display it in the frontend.

Let’s say your product category title is “Tables”. This will show up in the navigation menu if you have set it up that way, in te breadcrumbs if you have any, in the sidebar category widgets, and as a title on the single product category page.

This is great and all, but what if your product category name is “Red Round Tables By Whatever Brandname“? As you can imagine, displaying this in a sidebar or navigation menu may be a little too much, while it’s fine to use it as a H1 on the single product category page for SEO reasons and enhanced readability.

So, the question is – how do we define an “alternative” product category name, so that this can be used on the product category page as custom title, while using the default one for other smaller locations such as menus and widgets?

Well, this is how it’s done – enjoy!

Continue reading WooCommerce: Override Product Category Page Title

WooCommerce: Change Payment Gateway Order Status

Ok, we all know that Stripe, PayPal and all successful online payment orders go to “processing” order status, BACS and cheque go to “on-hold”, and so on. Each payment gateway has its own default paid status.

Now, what if you use custom order statuses, or what if you wish to change Stripe orders to “completed”, BACS orders to “pending” and PayPal orders to “on-hold”? Thankfully, this is super easy with a handy PHP snippet. Enjoy!

Continue reading WooCommerce: Change Payment Gateway Order Status

WooCommerce: Rename “Place Order” Based on Chosen Payment Gateway

We’ve already seen how to rename the “Place Order” button on the WooCommerce Checkout page, but today I want to find a way to rename it dynamically and conditionally i.e. based on the payment gateway that is selected while checking out.

The snippet requires the payment gateway “ID” – here’s a quick tut in case you don’t know how to retrieve that: How to Find WooCommerce Payment Gateway ID

Other than that, it’s pretty simple logic. Enjoy!

Continue reading WooCommerce: Rename “Place Order” Based on Chosen Payment Gateway

WooCommerce: Switch Shop Columns Responsively

Ok, I may need an English language refresher… But the point I was trying to make was that yes, there is a way to switch the number of columns in the WooCommerce shop page, however that’s static.

What if I wanted to show 5 columns of products on large desktops, 4 columns on desktops, 3 on tablets and 2 on smaller devices? Well, this “dynamic” behavior is – this time around – managed by CSS. Let’s see how it’s done!

Continue reading WooCommerce: Switch Shop Columns Responsively

WooCommerce: Get List Of All Customers

Today’s snippet is a helpful shortcut for getting the list of customers in your WooCommerce website. This may be necessary during customization, especially if you need tailor-made features for administrators and shop managers in the backend or frontend.

How did I find out about the solution below? Well, our job is mainly copy/paste from online forums or read thoroughly the WooCommerce core files on a daily basis – so it must’ve been one of the two. Enjoy!

Continue reading WooCommerce: Get List Of All Customers

WooCommerce: How to Add a Top Bar to Storefront Theme

The Storefront theme is one of the most popular WooCommerce themes. As of today, it has 200,000 active installations and 4.5/5 ratings, as well as a great overall performance.

But sure, you can’t win them all. Storefront is missing an important feature: the top bar. That’s a pity, because most ecommerce themes have either a dedicated widget area or somewhere you can add content in the theme options.

So, let’s go fix that. Here’s how to add a top bar with a background to your Storefront theme. Enjoy!

Continue reading WooCommerce: How to Add a Top Bar to Storefront Theme

WooCommerce: “Sale” Category (Automatic)

You can use a shortcode or block in order to display the WooCommerce products on sale. However, what if you wanted a proper “product category” called “Sale” – and where you didn’t need to manually assign this category to each product?

Basically, how do we display all the discounted products in a custom category called “Sale”, without doing any manual work?

Here’s a super quick tutorial. Enjoy!

Continue reading WooCommerce: “Sale” Category (Automatic)